Are you interested in contributing but do not know where to start? Head over to the documentation or start by following these step-by-step instructions and build CODE from scratch.
Build CODE
Build Collabora Online Development Edition. Choose your operating system or opt for using Gitpod (hack, build, debug and run entirely using a web-browser) from the list below for straightforward instructions to get you going quickly. If you are a seasoned developer with commit access, or just feeling extraordinarily brave, feel free to follow the general instructions.
Gitpod
On top of our daily Collabora Office core archives, we have also added integration support for Gitpod, a cloud based development environment. Now you can start hacking Collabora Online (COOL) in under ~5 minutes!
Steps to quick start:
- Sign-up on Gitpod.io with your GitHub account
- Install the proper extension for your browser
- Go to COOL repo
- Click on the green Gitpod button near the top of the GitHub repo page

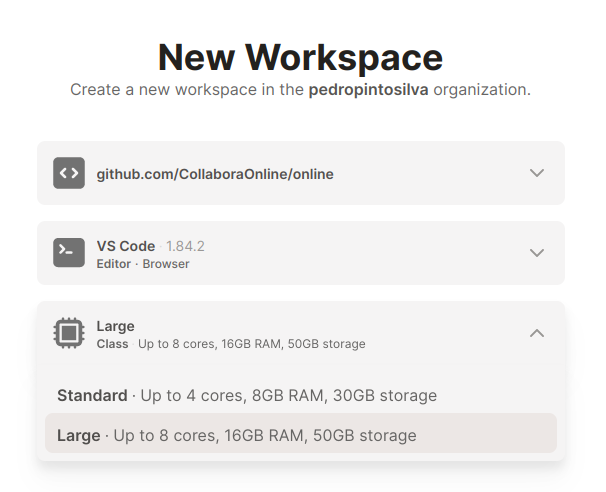
- You should be redirected to gitpod.io where you can set your workspace settings. Please choose large container:
- Make sure your browser is not blocking windows/tabs from opening from the gitpod workspace URL (maybe add
*.gitpod.ioto your browser’s whitelist) - VNC tab will open automatically if not just click on the left icon
Remote explorerand click6080. You will see a tab completely black, that’s normal.
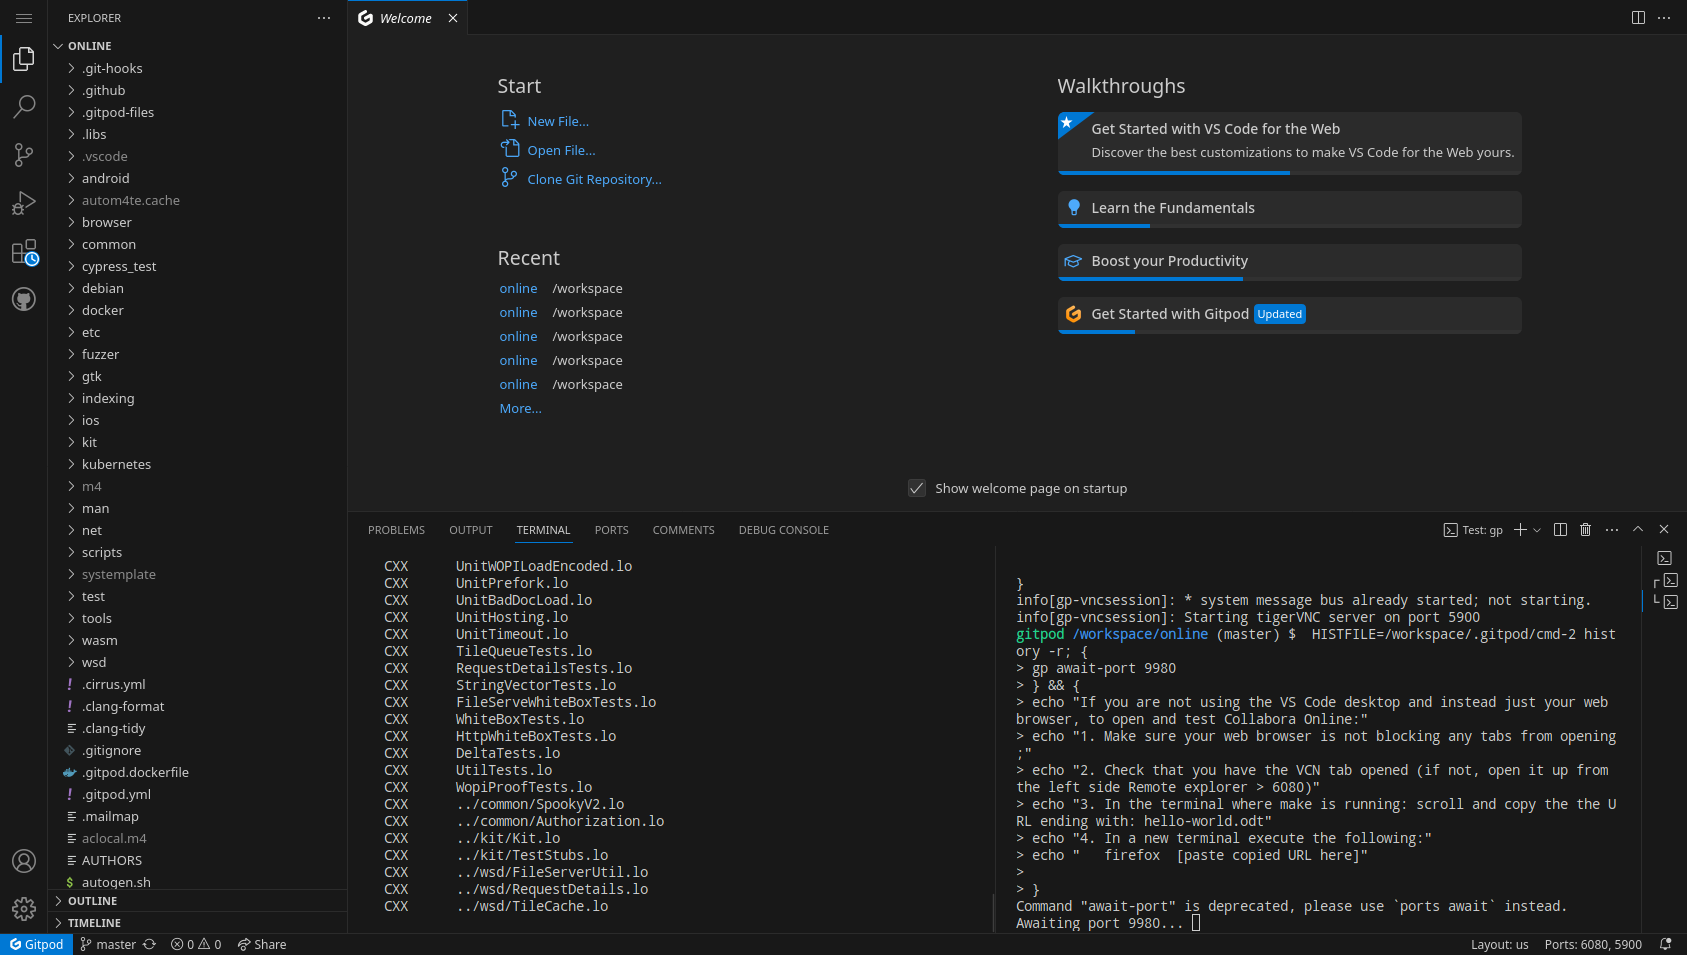
- Wait for a few minutes, and you will have a full development environment with COOL already cloned & built, ready-to-start/develop.
The GitPod tasks will run automatically and further instructions will be printed out right in the terminal
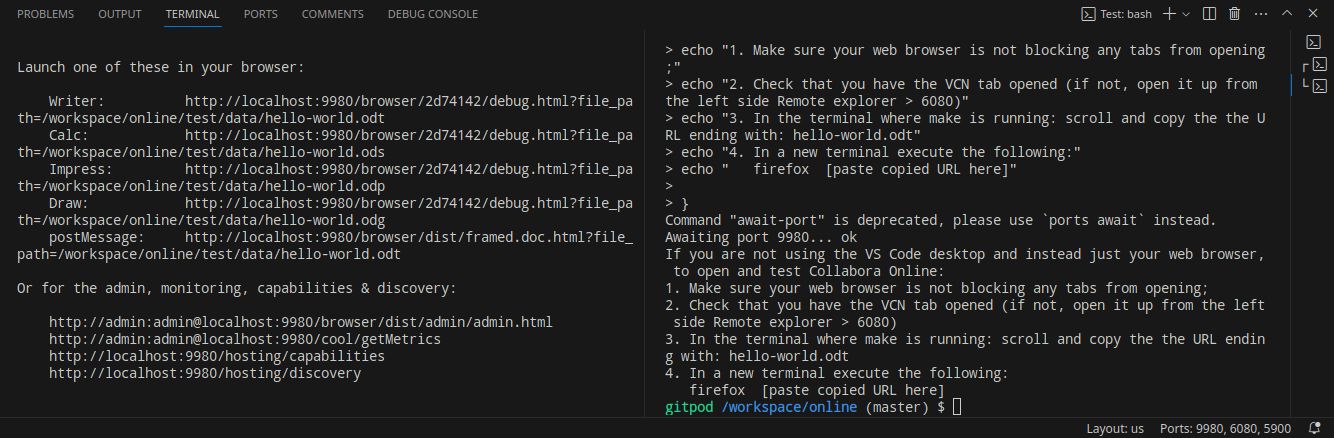
After the build finishes (left terminal pane) you will see links. Copy the URL ending with:
hello-world.odtIn the right terminal pane execute the following:
firefox [paste copied URL here]or/usr/bin/chromium [paste copied URL here]Now head over to the web browser tab where the VNC is opened, you will see Firefox/Chromium opening there, maximize and have fun.
You can also run cypress tests via GitPod. To do so, please prepend
CYPRESS_BROWSER="/usr/bin/chromium"("firefox"can also be used). Example:cd cypress_test/CYPRESS_BROWSER="/usr/bin/chromium" make checkfor every test orCYPRESS_BROWSER="/usr/bin/chromium" make check-desktop spec=impress/scrolling_spec.jsfor one specific test on desktop- More info at https://github.com/CollaboraOnline/online/blob/main/cypress_test/README
Don’t forget to fork the main repo

And set the remote address in .git/config to point to your fork’s address with this command:
git remote set-url origin https://github.com/PUT-YOUR-GITHUB-USERNAME-HERE/online.git
Happy hacking! : )
First published on Collabora Online Community Roundup #2
Running & Hacking
Now do:
make run
The output will contain the links that you can directly follow to see Writer, Calc, and Impress test documents in your browser.
Hacking it
When you change a JavaScript file (they are located under the browser/
subdirectory), you need to stop the existing CODE instance and issue make run again, because the files are cached.
Alternatively you can export a variable like:
export COOL_SERVE_FROM_FS=1
to avoid the caching, so that you can just Shift+Reload the pages to see the new content.
If you are using VS Code as your IDE and want to run code in your local VS Code with local ports, follow these steps:
- Open Gitpod and navigate to the top left option.
- Select
Gitpod: Open in VS Code. - Install the following extensions in your VS Code:
Gitpod,Remote - SSH,Remote - SSH: Editing Configuration Files, andRemote Explorer. - Configure your SSH key in VS Code.
- Once everything is set up, type make run. This will allow you to access the hosted port on your local machine.
openSUSE
The instructions below have been prepared for and tested on openSUSE Leap 15.3. You might need to do small adjustments for other releases.
Dependencies
We need Collabora Office core, POCO library and several other libraries and tools to build CODE. Open a terminal and follow the steps below.
# For Leap 15.5
zypper ar http://download.opensuse.org/repositories/devel:/libraries:/c_c++/15.5/devel:libraries:c_c++.repo
If this is a fresh installation it might be worth install devel-basis pattern: Minimal set of tools for compiling and linking applications. It will bring in things like git, gcc, etc.
sudo zypper install -t pattern devel_basis
Now go ahead and install the following packages
zypper in poco-devel libcap-progs python3-polib libcap-devel npm libtool cppunit-devel pam-devel python3-lxml chromium

# If you are using Leap 15.4 please install this aditional compatability library
zypper in libpng16-compat-devel
Collabora Office Core
CODE needs Collabora Office core to be built to run. However, it takes a considerable amount of time and brings in extra complexity. So, we will instead download a daily built archive which contains only the pieces that are absolutely necessary. If you are working only on the online side, without doing any code-level changes on the Collabora Office core, or you just want to quickly get going to do some small fixes, then this will be enough for you. Otherwise, refer to the general instructions.
Now download a daily-built archive of Collabora Office core:
wget https://github.com/CollaboraOnline/online/releases/download/for-code-assets/core-main-assets.tar.gz
Extract the contents of the archive:
tar xvf core-main-assets.tar.gz
Export the location of the extracted contents as a variable before changing directory:
export LOCOREPATH=$(pwd)

# Or make it persistent as part of your .bashrc with
echo "export LOCOREPATH=$(pwd)" >> ~/.bashrc && source ~/.bashrc
Building CODE
You need to clone it, run autoconf/automake, configure and build using GNU make. Before moving on, fork the repo if you haven’t done that yet.
Now clone the forked repo:
git clone https://github.com/YOURUSERNAME/online.git collabora-online
Switch to the local clone’s directory:
cd collabora-online
Run autogen to generate the configure file:
./autogen.sh
Run the generated configure script with proper parameters:
./configure --enable-silent-rules --with-lokit-path=${LOCOREPATH}/include \
            --with-lo-path=${LOCOREPATH}/instdir \
            --enable-debug --enable-cypress
Note: you can also add --disable-ssl instead of changing coolwsd.xml every time you want to disable ssl.
Start the actual build, which might take from a few minutes to half an hour (or more) depending on how powerful your machine is:
make -j $(nproc)
Running & Hacking
Now do:
make run
The output will contain the links that you can directly follow to see Writer, Calc, and Impress test documents in your browser.
Hacking it
When you change a JavaScript file (they are located under the browser/
subdirectory), you need to stop the existing CODE instance and issue make run again, because the files are cached.
Alternatively you can export a variable like:
export COOL_SERVE_FROM_FS=1
to avoid the caching, so that you can just Shift+Reload the pages to see the new content.
Fedora
The instructions below have been prepared for and tested on Fedora 37. You might need to do small adjustments for Fedora-based distributions.
Dependencies
We need Collabora Office core, POCO library and several other libraries and tools to build CODE.
Open a terminal and follow the steps below:
sudo dnf install \
    chromium \
    cppunit-devel \
    gcc \
    gcc-c++ \
    libcap-devel \
    libpng \
    libpng-devel \
    libstdc++-devel \
    libtool \
    libzstd-devel \
    nodejs \
    nodejs-devel \
    npm \
    pam-devel \
    poco-devel \
    python3-polib
Collabora Office Core
CODE needs Collabora Office core to be built to run. However, it takes a considerable amount of time and brings in extra complexity. So, we will instead download a daily built archive which contains only the pieces that are absolutely necessary. If you are working only on the online side, without doing any code-level changes on the Collabora Office core, or you just want to quickly get going to do some small fixes, then this will be enough for you. Otherwise, refer to the general instructions.
Now download a daily-built archive of Collabora Office core:
wget https://github.com/CollaboraOnline/online/releases/download/for-code-assets/core-main-assets.tar.gz
Extract the contents of the archive:
tar xvf core-main-assets.tar.gz
Export the location of the extracted contents as a variable before changing directory:
export LOCOREPATH=$(pwd)

# Or make it persistent as part of your .bashrc with
echo "export LOCOREPATH=$(pwd)" >> ~/.bashrc && source ~/.bashrc
Building CODE
You need to clone it, run autoconf/automake, configure and build using GNU make. Before moving on, fork the repo if you haven’t done that yet.
Now clone the forked repo:
git clone https://github.com/YOURUSERNAME/online.git collabora-online
Switch to the local clone’s directory:
cd collabora-online
Run autogen to generate the configure file:
./autogen.sh
Run the generated configure script with proper parameters:
./configure --enable-silent-rules --with-lokit-path=${LOCOREPATH}/include \
            --with-lo-path=${LOCOREPATH}/instdir \
            --enable-debug --enable-cypress
Note: you can also add --disable-ssl instead of changing coolwsd.xml every time you want to disable ssl.
Start the actual build, which might take from a few minutes to half an hour (or more) depending on how powerful your machine is:
make -j $(nproc)
Running & Hacking
Now do:
make run
The output will contain the links that you can directly follow to see Writer, Calc, and Impress test documents in your browser.
Hacking it
When you change a JavaScript file (they are located under the browser/
subdirectory), you need to stop the existing CODE instance and issue make run again, because the files are cached.
Alternatively you can export a variable like:
export COOL_SERVE_FROM_FS=1
to avoid the caching, so that you can just Shift+Reload the pages to see the new content.
Arch
The instructions below have been prepared for and tested on Manjaro 21.2.3. You might need to do small adjustments for Arch and/or other Arch-based distributions.
Dependencies
We need Collabora Office core, POCO library and several other libraries and tools to build CODE.
Open a terminal and follow the steps below:
sudo pacman -Syu libcap libcap-ng lib32-libcap libpng poco cppunit nodejs npm chromium python-lxml python-polib
Collabora Office Core
CODE needs Collabora Office core to be built to run. However, it takes a considerable amount of time and brings in extra complexity. So, we will instead download a daily built archive which contains only the pieces that are absolutely necessary. If you are working only on the online side, without doing any code-level changes on the Collabora Office core, or you just want to quickly get going to do some small fixes, then this will be enough for you. Otherwise, refer to the general instructions.
Now download a daily-built archive of Collabora Office core:
wget https://github.com/CollaboraOnline/online/releases/download/for-code-assets/core-main-assets.tar.gz
Extract the contents of the archive:
tar xvf core-main-assets.tar.gz
Export the location of the extracted contents as a variable before changing directory:
export LOCOREPATH=$(pwd)

# Or make it persistent as part of your .bashrc with
echo "export LOCOREPATH=$(pwd)" >> ~/.bashrc && source ~/.bashrc
Building CODE
You need to clone it, run autoconf/automake, configure and build using GNU make. Before moving on, fork the repo if you haven’t done that yet.
Now clone the forked repo:
git clone https://github.com/YOURUSERNAME/online.git collabora-online
Switch to the local clone’s directory:
cd collabora-online
Run autogen to generate the configure file:
./autogen.sh
Run the generated configure script with proper parameters:
./configure --enable-silent-rules --with-lokit-path=${LOCOREPATH}/include \
            --with-lo-path=${LOCOREPATH}/instdir \
            --enable-debug --enable-cypress
Note: you can also add --disable-ssl instead of changing coolwsd.xml every time you want to disable ssl.
Start the actual build, which might take from a few minutes to half an hour (or more) depending on how powerful your machine is:
make -j $(nproc)
Running & Hacking
Now do:
make run
The output will contain the links that you can directly follow to see Writer, Calc, and Impress test documents in your browser.
Hacking it
When you change a JavaScript file (they are located under the browser/
subdirectory), you need to stop the existing CODE instance and issue make run again, because the files are cached.
Alternatively you can export a variable like:
export COOL_SERVE_FROM_FS=1
to avoid the caching, so that you can just Shift+Reload the pages to see the new content.
Debian
The instructions below have been prepared for and tested on Debian GNU/Linux 11 (bullseye). You might need to do small adjustments for other releases.
Note: Sometimes Debian comes without sudo preinstalled. If you do not have sudo, you will need to run apt install -y sudo as root. It is not good enough to only run the commands which require sudo below as root, as sudo is also run during make
Dependencies
We need Collabora Office core, POCO library and several other libraries and tools to build CODE. Open a terminal and follow the steps below.
Lets start by installing the dialog package, which will be needed while installing some
of the other packages:
sudo apt install -y dialog
Now install the rest of the required packages:
sudo apt install -y libpoco-dev python3-polib libcap-dev npm \
                    libpam-dev wget git build-essential libtool \
                    libcap2-bin python3-lxml libpng-dev libcppunit-dev \
                    pkg-config fontconfig chromium
Collabora Office Core
CODE needs Collabora Office core to be built to run. However, it takes a considerable amount of time and brings in extra complexity. So, we will instead download a daily built archive which contains only the pieces that are absolutely necessary. If you are working only on the online side, without doing any code-level changes on the Collabora Office core, or you just want to quickly get going to do some small fixes, then this will be enough for you. Otherwise, refer to the general instructions.
Now download a daily-built archive of Collabora Office core:
wget https://github.com/CollaboraOnline/online/releases/download/for-code-assets/core-main-assets.tar.gz
Extract the contents of the archive:
tar xvf core-main-assets.tar.gz
Export the location of the extracted contents as a variable before changing directory:
export LOCOREPATH=$(pwd)

# Or make it persistent as part of your .bashrc with
echo "export LOCOREPATH=$(pwd)" >> ~/.bashrc && source ~/.bashrc
Building CODE
You need to clone it, run autoconf/automake, configure and build using GNU make. Before moving on, fork the repo if you haven’t done that yet.
Now clone the forked repo:
git clone https://github.com/YOURUSERNAME/online.git collabora-online
Switch to the local clone’s directory:
cd collabora-online
Run autogen to generate the configure file:
./autogen.sh
Run the generated configure script with proper parameters:
./configure --enable-silent-rules --with-lokit-path=${LOCOREPATH}/include \
            --with-lo-path=${LOCOREPATH}/instdir \
            --enable-debug --enable-cypress
Note: you can also add --disable-ssl instead of changing coolwsd.xml every time you want to disable ssl.
Start the actual build, which might take from a few minutes to half an hour (or more) depending on how powerful your machine is:
make -j $(nproc)
Running & Hacking
Now do:
make run
The output will contain the links that you can directly follow to see Writer, Calc, and Impress test documents in your browser.
Hacking it
When you change a JavaScript file (they are located under the browser/
subdirectory), you need to stop the existing CODE instance and issue make run again, because the files are cached.
Alternatively you can export a variable like:
export COOL_SERVE_FROM_FS=1
to avoid the caching, so that you can just Shift+Reload the pages to see the new content.
Ubuntu
The instructions below have been prepared for and tested on Ubuntu 20.04 LTS. You might need to do small adjustments for other releases.
Dependencies
We need Collabora Office core, POCO library and several other libraries and tools to build CODE. Open a terminal and follow the steps below.
Lets start by installing the dialog package, which will be needed while installing some
of the other packages:
sudo apt install -y dialog
Now install the rest of the required packages:
sudo apt install -y libpoco-dev python3-polib libcap-dev libssl-dev npm \
                    libpam-dev libzstd-dev wget git build-essential libtool \
                    libcap2-bin python3-lxml libpng-dev libgif-dev libcppunit-dev \
                    pkg-config fontconfig snapd chromium-browser
Note: Chromium is needed and used in the cypress tests. Ubuntu has no Chromium deb packages in its repositories, only a dummy package that points to the respective snap. Probably best to make sure you have snapd installed and install chromium-browser which in turn will install the snap package.
Collabora Office Core
CODE needs Collabora Office core to be built to run. However, it takes a considerable amount of time and brings in extra complexity. So, we will instead download a daily built archive which contains only the pieces that are absolutely necessary. If you are working only on the online side, without doing any code-level changes on the Collabora Office core, or you just want to quickly get going to do some small fixes, then this will be enough for you. Otherwise, refer to the general instructions.
Now download a daily-built archive of Collabora Office core:
wget https://github.com/CollaboraOnline/online/releases/download/for-code-assets/core-main-assets.tar.gz
Extract the contents of the archive:
tar xvf core-main-assets.tar.gz
Export the location of the extracted contents as a variable before changing directory:
export LOCOREPATH=$(pwd)

# Or make it persistent as part of your .bashrc with
echo "export LOCOREPATH=$(pwd)" >> ~/.bashrc && source ~/.bashrc
Building CODE
You need to clone it, run autoconf/automake, configure and build using GNU make. Before moving on, fork the repo if you haven’t done that yet.
Now clone the forked repo:
git clone https://github.com/YOURUSERNAME/online.git collabora-online
Switch to the local clone’s directory:
cd collabora-online
Run autogen to generate the configure file:
./autogen.sh
Run the generated configure script with proper parameters:
./configure --enable-silent-rules --with-lokit-path=${LOCOREPATH}/include \
            --with-lo-path=${LOCOREPATH}/instdir \
            --enable-debug --enable-cypress
Note: you can also add --disable-ssl instead of changing coolwsd.xml every time you want to disable ssl.
Start the actual build, which might take from a few minutes to half an hour (or more) depending on how powerful your machine is:
make -j $(nproc)
Running & Hacking
Now do:
make run
The output will contain the links that you can directly follow to see Writer, Calc, and Impress test documents in your browser.
Hacking it
When you change a JavaScript file (they are located under the browser/
subdirectory), you need to stop the existing CODE instance and issue make run again, because the files are cached.
Alternatively you can export a variable like:
export COOL_SERVE_FROM_FS=1
to avoid the caching, so that you can just Shift+Reload the pages to see the new content.
Nix/NixOS
What this is
This is a set of shells used for development. It will let you build collabora from dependencies installed with Nix.
Supported platforms
Currently the Nix build has only been tested on x86_64-linux NixOS. It would
probably be possible to make it run on aarch64-linux fairly easily. It may
also be possible to make darwin shells for building the iOS app.
How do I do it?
Follow the instructions in the nix-build-support repository. They will lead you through cloning Collabora Office core and Collabora online, configuring your build and running your newly-built CODE.
Build CODE & Core
Dependencies
CODE must be built on Linux, and you need the following:
- Collabora Office core
- Either build core from source, or download a daily built archive (see below)
- Poco library: http://pocoproject.org/
- Either use the package from your distro, or build it yourself, ideally 1.10.1 or later
- libpng, libcap-progs, libtool, automake, autoconf, pkg-config, sudo, pam
- Use the packages from your distro
You may also want to have the following optional dependencies:
- Chromium
- Needed for running cypress tests
- The lxml and polib libraries for python
- Needed for building javascript
- These can both be installed via pip or your distro’s packages
- Cppunit
- Needed for unit tests
- Node.js
- Needed for building the JS parts (not needed if you build them on another linux machine)
Collabora Office Core
CODE needs Collabora Office core to be built to run. You have two options to meet this requirement: either by building it locally (Option A - recommended), or by downloading a daily built archive (Option B - quick & dirty) which contains only the absolutely necessary pieces. If you are working only on the online side, without doing any code-level changes on Collabora Office core, or you just want to quickly get going to do some small fixes, you may prefer the second way.
Option A - Build core locally (Recommended)
A few modifications are needed in order to support building CODE with Collabora Office core. For dependency installation, refer to https://wiki.documentfoundation.org/Development/BuildingOnLinux.
Clone the repository and switch to the main branch:
git clone https://gerrit.collaboraoffice.com/core
cd core
git checkout main
Configure and build, adding the following configuration options to autogen.sh or autogen.input:
./autogen.sh --with-distro=CPLinux-LOKit --without-package-format
make -j $(nproc)
You can expect this process to take at least an hour or two the first time, possibly more depending on your machine and your internet connection. Subsequent builds will be faster.
Option B - Download a Daily-Built Archive of Collabora Office Core (Quick & Dirty)
CODE needs Collabora Office core to be built to run. However, it takes a considerable amount of time and brings in extra complexity. So, we will instead download a daily built archive which contains only the pieces that are absolutely necessary. If you are working only on the online side, without doing any code-level changes on the Collabora Office core, or you just want to quickly get going to do some small fixes, then this will be enough for you. Otherwise, refer to the general instructions.
Now download a daily-built archive of Collabora Office core:
wget https://github.com/CollaboraOnline/online/releases/download/for-code-assets/core-main-assets.tar.gz
Extract the contents of the archive:
tar xvf core-main-assets.tar.gz
Export the location of the extracted contents as a variable before changing directory:
export LOCOREPATH=$(pwd)

# Or make it persistent as part of your .bashrc with
echo "export LOCOREPATH=$(pwd)" >> ~/.bashrc && source ~/.bashrc
You should now have two new directories extracted: instdir and include. You will use the locations of these directories for the configure parameters in the following steps.
Building CODE
You need to clone it, run autoconf/automake, configure and build using GNU make:
git clone https://github.com/YOURUSERNAME/online.git collabora-online
Switch to the local clone’s directory:
cd collabora-online
Run autogen to generate the configure file:
./autogen.sh
Run the generated configure script with proper parameters:
./configure --enable-silent-rules --with-lokit-path=${LOCOREPATH}/include \
            --with-lo-path=${LOCOREPATH}/instdir \
            --enable-debug --enable-cypress
Note: you can also add --disable-ssl instead of changing coolwsd.xml every time you want to disable ssl.
Start the actual build, which might take from a few minutes to half an hour (or more) depending on how powerful your machine is:
make -j $(nproc)
You can also add extra flags to customize your build:
- If you built POCO from source, add
--with-poco-includes=<POCODIRECTORY>/include --with-poco-libs=<POCODIRECTORY>/lib - Add
--enable-silent-rulesto create less verbose build output - Add
--enable-cypressto enable tests which use a browser (requires Chromium)
See ./configure --help for the full list of options.
Make sure we use unbundled libraries within POCO libraries. For this, we should export CFLAGS and CCFLAGS appropriately.
export CFLAGS="$CFLAGS -DPOCO_UNBUNDLED=1"
export CXXFLAGS="$CXXFLAGS -DPOCO_UNBUNDLED=1"

make -j `nproc`
If you want to run the unit tests, use make check instead of make.
Note that the coolforkit program needs the CAP_SYS_CHROOT capability,
thus you will be asked the root password when running make as it
invokes sudo to run /sbin/setcap.
Running & Hacking
Now do:
make run
The output will contain the links that you can directly follow to see Writer, Calc, and Impress test documents in your browser.
Hacking it
When you change a JavaScript file (they are located under the browser/
subdirectory), you need to stop the existing CODE instance and issue make run again, because the files are cached.
Alternatively you can export a variable like:
export COOL_SERVE_FROM_FS=1
to avoid the caching, so that you can just Shift+Reload the pages to see the new content.
Running manually
If you want to do the ‘make run’ yourself, you need to set up a minimal chroot system, and directory for the jails:
SYSTEMPLATE=`pwd`/systemplate  # or tweak for your system
ROOTFORJAILS=`pwd`/jails       # or tweak for your system
ROOTFORCACHE=`pwd`/cache       # or tweak for your system

rm -Rf ${SYSTEMPLATE} # clean
./coolwsd-systemplate-setup ${SYSTEMPLATE} ${MASTER}/instdir # build template
mkdir -p ${ROOTFORJAILS} # create location for transient jails.
mkdir -p ${ROOTFORCACHE} # create location for persistent cache.
To run coolwsd the way it is supposed to eventually be run “for real”, you can now do:
./coolwsd --o:sys_template_path=${SYSTEMPLATE} --o:child_root_path=${ROOTFORJAILS} --o:cache_files.path=${ROOTFORCACHE}
The ${SYSTEMPLATE} is a directory tree set up using the coolwsd-systemplate-setup script here. (It should not exist before running the script.) It will contain the runtime environment needed by the LibreOffice dynamic libraries used through LibreOfficeKit. Improvements to that script are very likely needed on various distros.
The ${ROOTFORJAILS} directory above is a presumably initially empty directory under which coolwsd will create chroot jails for editing each specific document. Warning: the jails directory and its contents are deleted by coolwsd.
As coolwsd uses hardlinks to “copy” the contents of both ${SYSTEMPLATE} and the ${MASTER}/instdir directories into each chroot jail, ${SYSTEMPLATE} and ${MASTER}/instdir need to be on the same file system as ${ROOTFORJAILS}.
Leaflet files are served itself by coolwsd internal file server. You can specify the root of this fileserver using the –o:file_server_root_path flag in coolwsd commandline. By default, if you do not specify this flag, the parent directory of coolwsd/ is assumed to be the file_server_root_path. So, for development purposes, you can access the COOL files (using /browser/), but it is advised to explicitly set the file_server_root_path to prevent any unwanted files from reading, especially when cool is deployed for normal public usage on servers.
Please note that it is necessary that all the COOL files that are meant to be served is under a directory named ‘browser’. Since, the COOL files, in the git repo, are itself in a directory named ‘browser’, this would work out of the box for development purposes.
If you run coolwsd on HTTPS, you have to set up your own private key and certificates (in PEM format only). The name and location of key, certificate and CA certificate chain is defined in ${sysconfdir}/coolwsd/coolwsd.xml. Dummy self-signed cert.pem, ca-chain.cert.pem and key.pem are already included, but it is better to replace those with your own files.
generate the new self-signed certificate
To generate the new self-signed certificate, you can do the following. Maybe there is a less verbose way, but this worked for me:
# create the ca-chain.cert.pem

mkdir private

openssl genrsa -aes256 -out private/ca.key.pem 4096

# You will be asked many questions, put the IP in Common Name
openssl req -new -x509 -days 365 -key private/ca.key.pem -sha256 -extensions v3_ca -out ca.cert.pem

openssl genrsa -aes256 -out private/intermediate.key.pem 4096

openssl req -sha256 -new -key private/intermediate.key.pem -out intermediate.csr.pem

mkdir -p demoCA/newcerts
touch demoCA/index.txt
echo 1000 > demoCA/serial
openssl ca -keyfile private/ca.key.pem -cert ca.cert.pem -extensions v3_ca -notext -md sha256 -in intermediate.csr.pem -out intermediate.cert.pem

cat intermediate.cert.pem ca.cert.pem > ca-chain.cert.pem

# create the key / cert

openssl genrsa -out key.pem 2048

openssl req -sha256 -new -key key.pem -out csr.pem

# change "unique_subject = yes" to "unique_subject = no" in demoCA/index.txt.attr
# otherwise you'll get the following error:
#   failed to update database
#   TXT_DB error number 2

openssl ca -keyfile private/ca.key.pem -cert ca.cert.pem -extensions usr_cert -notext -md sha256 -in csr.pem -out cert.pem
HTTPS is the default. HTTP-only mode can be enabled with –disable-ssl configure option.
If you plan to hack on coolwsd, you probably want to familiarize yourself with coolwsd’s –o:num_prespawn_children switch, and the ‘connect’ test program.
For interactive testing, you can use the ‘connect’ program. It accepts “commands” from the protocol on standard input.
Troubleshooting
AppArmor Error
If you encounter the following error when building Collabora Online:
apparmor_restrict_unprivileged_userns is enabled, which blocks user namespaces
WARNING: install podman to workaround this
make: *** [Makefile:9080: run] Error 1
This issue occurs because AppArmor restricts unprivileged user namespaces. To resolve it, you need to disable this restriction with a persistent setting.
Solution:
Disable the restriction by creating a new configuration file at /etc/sysctl.d/60-apparmor-namespace.conf with the following content:
kernel.apparmor_restrict_unprivileged_userns=0
Reboot your system to apply the changes.
After rebooting, you should be able to continue the build process without encountering the error.
Poco 1.13.0 Crash on Startup (make run)
When running make run, Poco 1.13.0 may crash on startup with the following error:
Failed to initialize COOLWSD: Null pointer: strategy in file "./Foundation/src/FileChannel.cpp", line 283
This happens due to the use of rotation="never" for the log rotation strategy in coolwsd.xml.
Solution
Update the log rotation strategy in coolwsd.xml:
Change
rotation="never"to:
rotation="monthly"
This resolves the crash.
Note: This is a dependency-related issue that may be resolved in future versions. You can also refer to the online repository’s development notes for the most current information regarding dependency issues: https://github.com/CollaboraOnline/online/blob/main/dev-notes/dependency-issues.md?plain=1#L12